Thursday, August 21, 2008

Star of the day


Once upon a time I attended a workshop given by Patricia Cunningham.
She is an author of Phonics They Use and Words Their Way. She gave us a wonderful way to introduce names to students and get them reading and writing. Here is my process. Before school starts I write each students name on a sentence strip. On the first day of school I give each child their name and they put it in the star of the day box. (Any box with a star on it will work. I have them put their own name in so they are sure that they will get a chance sometime!) Each day I draw out a name and we do the following activities for the name drawn.
1- I give the "star" a special sticker to wear and they are that day's helper.
2- We talk about the beginning letter of the name and count how many letters the name has.
3- We graph the number of letters in the name on a special graph.
4-Then we write the name on another sentence strip, I cut the letters apart to make a name puzzle and the rest of the students put the name together. The original name card and puzzle pieces go into an envelope that also has the child's name written on it. When I have about 5 of these they become part of the word work area. We also put the "stars" name on the word wall.
5.We then do the name cheer! The"star" child says "Give me a __" For each letter of his/her name and the other children enthusiastically shout the letter. When the letters are don the "star" says, "What does it spell?" And we all shout the "star's" name 3 times. (If the "star" is too shy to lead the cheer then the teacher gets to lead it."
6. Then we do an interview with the "star". We practice asking 3 questions to the "star", for example How many brothers and sister do you have? What is your favorite food? What is your favorite animal? I write the responses like this "Ellen has 1 brother and 1 sister. She likes to eat apples. Her favorite animal is an elephant. I personally like to write the interview on construction paper, add the child's picture and make a class book.
7.The last element of this is the star book. I give each child a clipboard and a blank piece of paper. Together we write the "stars" name. I model letter formation. This is often the first time any of my students have written anything beside their own name. It is fantastic letter writing practice. The students take their papers to the crayons and draw a picture of the "star". (We usually have to talk about body parts and hair color etc.) I then compile the pictures in a book for the "star" to take home.
I use the "star" of the day for my helpers for the rest of the year. I have a special star of the day poster with a Velcro spot in the middle. I take pictures of the kids, number the backs of the pictures to create an order ( I usually go boy/girl) and display the child's pictures when it is his/her turn to be the star. It is amazing how they memorize the order! And get the concepts of ordinal numbers. My students love to be the star of the day and I love only having 1 special helper to keep track of.
Thursday, August 14, 2008

Letter Cake


The letter cake is designed to go with the Dr Jean song Happy Birthday Letters which is on her Totally Reading CD (http://www.drjean.org/). The song goes "Hey A it's your birthday, let's all sing like your birthday /a/ /a/ /a/ /a/ /a/ /a/. " The /a /sound is made to the tune of Happy Birthday to You. The letter tube would serve as the candle on the cake
.


How I made this: The cake is a round gift box that I bought at Walgreen's during the after Christmas sale. The "candles" have 2 parts. First I put some large craft sticks into a clump of self drying clay. I molded the bottom of the clay so that it would sit flat and glued the craft sticks into the molded clay for stability.( I glued them after the clay had dried) Next I put a shiny sticker on the top of the craft stick to serve as a flame. I made three of these. Then I spray painted 26 toilet paper tubes gold. ( The gold spray paint was left over from our school's Christmas play. I put all the tubes in a cardboard box while I spray painted them to hold them still. The box also kept paint from landing anywhere other than the tubes and the box. I wore safety goggles and a dust mask while painting because it is not good to get paint in your eyes or lungs). I wrote each letter (capital and lowercase) on a white circular label. I put both the capital and lowercase letter on the same tube and secured the labels with clear packing tape. I used sticky tack to secure one or more of the craft stick holders onto the lid of the box. Now I can put one letter on the cake when we focus on that letter and sound, or I can put 3 letters on the cake to make a word. I can store the letters I want the students to use for word making inside the box to make it an independent game.

Squeezers


Squeezers are a way for students to practice making words as well as working on fine motor skills.

How I made them: I used clothespins, paint stir sticks and different colored permanent markers. I made squeezers for all the high frequency words that my students were expected to know by the end of the year. I put a smiley face on the handle so that the students would know which direction the word should be. I wrote the word on the paint stir stick leaving plenty of space between the letters for the clothespins. I wrote the words one letter per clothespin matching the color of the word on the paint stick. The students can remove the clothespins and mix them up and then put the word back together. Squeezing the clothespin helps to develop the writing muscles in the children's hands.

Book Bags


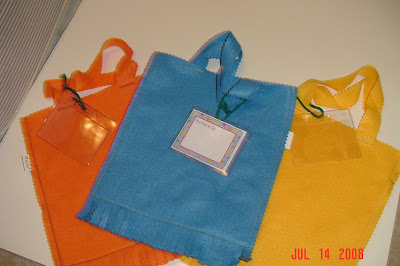
Book Bags: The first independent activity that I work on with my students beginning the first day of school, is how to read independently. I make sure each child has a book bag with at least 3 books inside. I label each bag with the child's name. I have tried using plastic bags both of the Ziploc variety and plastic bags I made out of the ends of laminating film. I find that cloth bags are sturdier, last longer and are much quieter than plastic bags. (Imagine 20 children crinkling plastic bags at the same time.) I also can reuse them from year to year. The name tags are those clear plastic holders the we often get at conventions and I slid a fun name tag inside the holder without removing the backing so it won't stick to the inside of the plastic case. I have a set of cubbies that are designated for the students "keep at school" work so they are stored easily. Some teachers prefer to use magazine type boxes for this purpose.
I rotate the books during my guided reading group time so that I know they always have new books to read that they are familiar with. I usually rotate every 3rd reading group.

Popcorn Chant


What this is for: This box goes with a chart song that I learned from Donna Whyte( http://www.thesmartiezone.com/ ). Chant to the tune Shoo Fly Don't Bother Me. The song lyrics are "Popcorn please pop for me! Popcorn please pop for me! Popcorn please pop for me! POP! POP! POPCORN! After the students are familiar with the words you can then substitute different consonants for all the "pops" in the song. For example if I chose the consonant "T" I would sing "Topcorn please top for me! (X3) TOP! TOP! TOPCORN! This is a fun phonics activity.

How I made this:I got this popcorn box at a fair and cut out paper popcorn shapes and wrote all the consonants on the shapes. The child then choose a piece of popcorn and the letter on the popcorn is the sound substitution. To make this activity independent I added a clothespin and a chart with the words to the song but I left all the substitution sound spots blank. The clothespin is to clip onto a paper popcorn piece making it a pointer. (Try saying that 5 times fast!) The child picks a letter and uses the pointer to modify the song.
Tip: I wrote the song on a rectangular sheet of foam which I hope will last longer than a laminated paper chart and be easier to store.
"o" in popcorn. For example, for the vowel "a" Papcorn please pap for me! x3 PAP! PAP! PAPCORN!

Mystery Cans


What this is for: These cans contain mystery letters or words that make up a mystery message. The letters may spell a child's name, high frequency word or spelling word. The mystery messages may be a question about a text or subject area that students need to answer or a journal guide question.


How I made this: Pictured here are plastic juice containers (the kind that hold frozen juice mix.) I taped legal sized envelopes around the cans with packaging tape. The letter "tiles" and words are written on plastic lids that come from drink bottles. (Most of mine came from soy milk containers). I used color coding so that the words or letters matched the color of the question mark on the can.

My Little Sister Ate One Hare

This is a story prop set for the book My Little Sister Ate One Hare by Bill Grossman. The purpose of this activity is to encourage my students to retell, summarize and act out this amusingly gross story.

To make this activity I used a thermal lunch bag. (Check the lost and found at your school for unclaimed treasures.) Some sheets of foam, permanent marker and Velcro. I drew the characters on the foam with permanent marker and cut around them creating one piece per character. I velcroed the little sisters face to the front flap of the lunch bag. (I did this in case I needed to replace the face, use the lunch bag for something else or I needed to store the entire set and wanted to put all the pieces inside the bag.) I plan to add the set to my classroom library after I have introduced the book and practiced with my students.