Tuesday, April 21, 2009

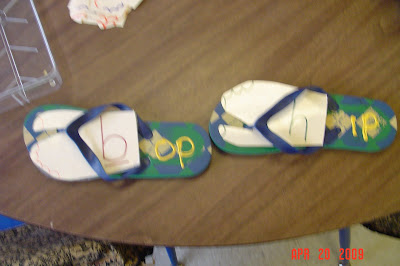
flip flop word families

Turn inexpensive flip flops into a fun word family game!
I started with a pair of flip flops and wrote flip on one and flop on the other with fabric paint. Then I traced "toes" on tag board pieces. I only defined the big toe so that it will easily slip through the thong part of the flip flop. I wrote a consonant on each side of the toes. The students add a consonant toe to one of the flip flops. The student then writes the newly created word down. ( I like to use white boards for this kind of activity to conserve paper.) The student can then flip the consonant and create a new word on the other flip flop.
Tip: I laminated the toe cards for durability. I also used flip flops that would appeal to both girls and boys.

Beautiful Beads

I was browsing in my local thrift store this past weekend when I found a bag of assorted beads from broken necklaces among the craft materials. It was less than $2.00 so I bought it. I separated them into 4 bins, 1 per table and added some yarn segments. Today, I had 5 minutes of "extra" time. We finished a lesson early, and everyone was already at their table and I had a momentary loss of what to do. I spied the beads, ready to go, sitting on my desk. Viola!
The students used: fine motor skills, (especially important for the developing writing muscles) patterning and counting skills, and social skills! (sharing and negotiating).

I plan to keep these ready to go until the end of the year. Then I'll let each child make a necklace to take home.
Tip: I dip the ends of the yarn in melted wax. This helps keep the yarn from tangling and makes threading the beads easier because the yarn doesn't unravel. I usually dip a big supply during the summer for all yarn needs that come up.
You can also use pipe cleaners (chenille rods) to make bracelets.


Sunday, April 19, 2009

Top 10 things to do with plastic containers


This innocent looking container holds a wealth of possibilities! Here are my top 11 favorite Kindergarten classroom uses for this free resource.
1.Transport container for fragile projects. (Keeps them nice and protected inside a backpack)
2.Holder of small manipulatives. (Especially if you want to give each child a specific number of manipulatives quickly, they make clean up a snap too!)
3. Container for games. (I like to use them for games that are sent home.)
4. Planters, plant containers. (We decorate them and add a plant for a nice mother's day gift.)
5.Building blocks. (Put the lids on and put a bunch in the block center.)
6.Matching game. (Have students match lids to containers. Only the specific brand's lid will fit it's matching container.)
7.Scissor caddy. (Cut some squares in the lid and add the scissors.)
8.Crayon and pencil box.
9.Letter Eater. (See reading ideas.)
10.No mess glitter station. (Put the item to be "glittered" inside, shake the glitter over it, and all excess glitter is caught in the container.)
11. Snow play!  Bring a selection of colored containers (avoid white or clear containers because they are easily lost in the snow and left behind) outside for recess fun of building snow castles, making snow dishes and carting snow from here to there.
Only have the lids? No problem. Here are some "lids only" ideas.
1. Snack plates.
2. Paint palettes. (The lip around the lid prevents paint spilling. This works well for glue too.)
3.Circle tracers. (Collect a variety of sizes and you have a nice snowman center)
4. Write a sight word in the center of the lid, add a magnet and create a word wall on your chalk board.
5. Number line. The same process as a word wall but with number instead.
Tips:
Wash the containers before using.
Make sure they are completely dry and put the lid on the container.
I like to collect a class supply in a bag. Then when I need them I bring them into school and passing them out is really easy.

Saturday, April 18, 2009

Listening Center

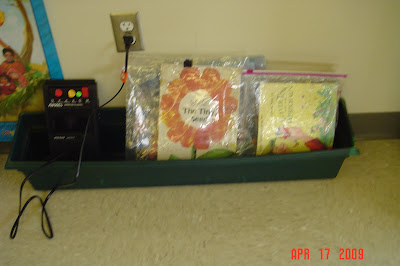
Listening centers are wonderful for beginning readers and ELL students. However, keeping everything organized can be difficult. Try this tip. I use long planters intended for window boxes as a listening center.

Students put the tape player on one end of the planter and prop the books up on the other. When it is time to use the center, students get a pillow or a blanket to put on the floor and then they get started.
I don't like to mess around with headphones. I teach the students to keep the volume low. Now I have need and usable listening centers.
Quick Note: During Independent work time only one student is allowed in each center, but at free play time I allow 3 students in each center.


April showers bring May flowers

This is a simple and delightful April and May craft project. You will need paper plates, construction paper and brad fasteners. First, get enough paper plates for each person in your class. On the top of the plate write "bring May flowers" and at the bottom of the plate write "April showers"
Next you will need to create umbrellas. I drew a black line master of the umbrella and the handle and copied them on different colored construction paper. I cut the 2 pieces apart so that I had a stack of umbrella tops and a stack of handles. I instructed the students to chose a top and handle but make sure they were different colors. Then I had them assemble the umbrellas and fasten them to the plates with the brad fasteners.
I made sure the umbrella was placed so that the words "April showers" were visible. Then I had the students draw raindrops under the umbrella.

Then we flipped the umbrella over and it became a basket and the students drew flowers inside the basket.


The kids think it's magic!